Using Project64
Project64 2.2 (and every versions before) doesn’t support 64DD at all.
Project64 is one of the most compatible Nintendo 64 emulators of the bunch for Windows, avoiding a lot of problems regarding most 64DD games.
This page will assume you are using the included build (at this time, Project64 3.0.2-Dev 64DD.org Build 2025/07/15).
You can find this build in the How To Play page, in the Emulators section.
Table of Contents:
- Instructions
- Extras
- Load an Expansion Disk
- Swapping Disks
- N64 Mouse
- Troubleshooting
- The face on Talent Studio becomes glitchy or black after I edit it
Instructions
Basics:
- Set up 64DD IPL ROMs (if you use the build from the website, you can skip this!)
- Setup the Plugins
First Step: Set up 64DD IPL ROMs
If you have downloaded the build on the website, you should not have to worry about this, it’s already done.
But in case it doesn’t work as intended, here’s how it works:
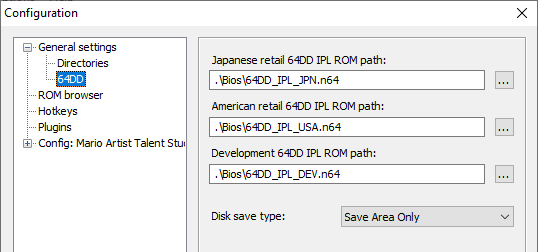
- On the menubar, go to Options, then Configuration.
- Select 64DD on the left side.
- Click on … buttons and select the appropriate 64DD IPL ROM for each region.
- You should see them in the Project64’s Bios folder on the included 64dd.org build.
- If you don’t have them, find them in the Database page in the IPL tab.
Second Step: Setup the Plugins
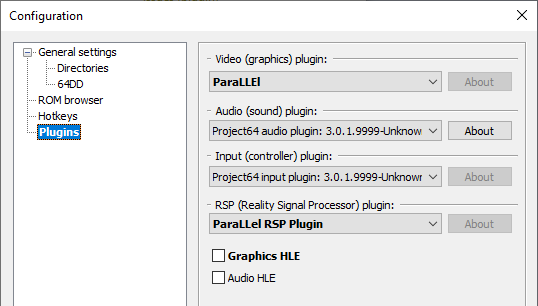
- On the menubar, go to Options, then Configuration.
- Select Plugins on the left side.
Here’s the gist about each of them:
- ParaLLEl: Accurate N64 Graphics emulation on the GPU. Should work with every game perfectly, however it does require a good GPU to handle it.
- Required: Please uncheck Graphics HLE for it to work!
- You can set RSP (Reality Signal Processor) plugin to ParaLLEl RSP Plugin, but it’s not required.
- angrylion’s RDP Plus: The exact same thing as parallel, but on the CPU instead, it can actually work decently if you have a beefy CPU but not a GPU to handle it.
- Required: Please uncheck Graphics HLE for it to work!
- You can set RSP (Reality Signal Processor) plugin to ParaLLEl RSP Plugin, but it’s not required.
- GLideN64: A more performant graphics emulation on the GPU, at the expense of accuracy.
- It’s best to check Graphics HLE and set RSP (Reality Signal Processor) plugin to RSP plugin 3.0.1.5664-2df3434, it can work with the others but it will set GLideN64 to a different mode that may not work as well.
- Warning: You cannot do modeling in Mario Artist Polygon Studio with this plugin. The game will mostly work except for that part.
You can set up the configuration of each plugin via Options on the menubar.
From there, do the other setups you might need to do, like setting the inputs and everything, and it should work just fine from there!
Extras
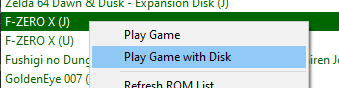
Load an Expansion Disk
- You can click on Start Combo:

-
And then select a Nintendo 64 cartridge ROM, and then a 64DD disk file.
- If you have setup a ROM Directory, you can then right click on a Nintendo 64 cartridge game in the list and select Play Game with Disk, you are then asked to select a 64DD disk file.
Swapping Disks
Warning: Do not swap disks until the game tells you that you can, else the game will get confused.
- On the menubar, go to System, then Swap Disk.
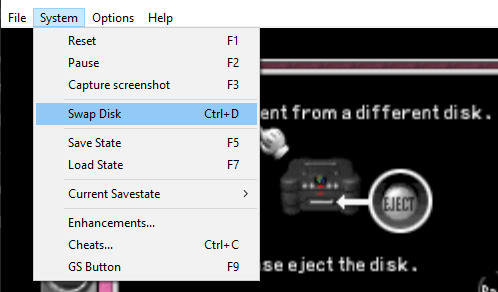
- Then select the 64DD disk file you want to swap with.
- You are usually expected to swap back to the original disk you started with, so don’t forget which file it is!
N64 Mouse
To use the N64 Mouse, you can now use the Project64-input plugin. If you were using N-Rage for this, please switch to Project64-input instead, it will be a lot easier.
For games that supports it, I highly recommend also plugging a regular controller alongside the mouse on another port.
Such as having a N64 Controller on Player 1, and N64 Mouse on Player 2.
The following games natively supports the N64 Mouse:
- Mario Artist Paint Studio
- Mario Artist Talent Studio
- Mario Artist Communication Kit
- Mario Artist Polygon Studio
- Dezaemon 3D (N64)
- Mario no Photopi (N64)
Here’s how you do it:
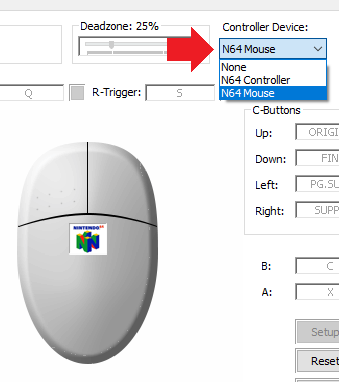
- Once you open the Input settings, select the Player tab, then select N64 Mouse as the Controller Device.
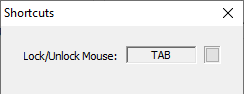
- You can go click on Shortcuts, to its right, where you can set the hotkey to Lock & Unlock Mouse. Remember it!
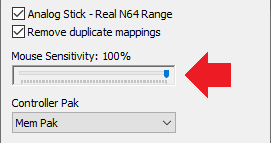
- On the bottom right, click on Options, where you can find the Mouse Sensitivity option, where I suggest to lower it down a lot.
- Feel free to set the sensitivity while playing and figure out the sweet spot for you.
- Feel free to set the sensitivity while playing and figure out the sweet spot for you.
And that’s it, no additional setup needed, and as long as a N64 Mouse is used, when you start up a game, the emulator should automatically lock it to itself.
Don’t worry too much if you forgot how to unlock it, just about anything that can make the emulator lose focus should unlock the mouse.
Troubleshooting
The face on Talent Studio becomes glitchy or black after I edit it
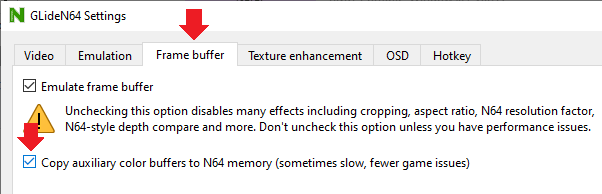
- You might be using GLideN64, so while the game is running, click on Settings on the menubar, then select Graphics.
- Then, click on Frame buffer tab, and then enable Copy auxiliary color buffers to N64 memory. This should fix it.
- You can go back to the face edit menu, it should remember the face you made, and then you can just exit it if you don’t wanna change anything, and it should be working.