Using ares
ares is aiming to be the most accurate Nintendo 64 emulator as possible, while still being simple to use.
However this means that the emulator will not be as accessible to lower end PCs, due to the use of Parallel-RDP as the main accurate graphics renderer.
This will require a little bit of setup at first. Don’t worry, nothing is very complicated to do.
You can find ares in the How To Play page, in the Emulators section.
Table of Contents:
- Instructions
- Extras
- N64 Mouse
- Swapping Disks
- Load N64 Game + Expansion Disk
- Troubleshooting
- Crash upon loading a 64DD game (up to v138 included)
- Random stuttering
- Reset the Date & Time
- Mario Artist Polygon Studio has issues selecting models
Instructions
The overall steps, if you feel like you know what you’re doing:
- Setup the IPL ROMs for each region with the firmware configuration of ares. (Find them in the Database page.)
- Setup the Controls.
- Setup the Date & Time as you launch a 64DD disk once.
- You’re ready to play 64DD games!
If you want a more detailed look at how to do it if you’re unsure, please read further from here.
First Step: Setup the IPL ROMs
-
The 64DD IPL ROMs are a requirement for 64DD emulation. You need to download them from the Database page and then click the IPL button to find them. Download all 3 of them for each region (Japanese, USA, Development). Make sure all of them are extracted.
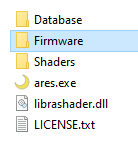
- You can put the 64DD IPL ROM files inside the Firmware folder (that you create yourself) once ares is extracted.
- Launch ares and you can find the Firmware menu by selecting Settings -> Firmware…:
- Then in the Firmware configuration tab as it shows, you can press the Scan button and it’ll find them automatically
- Alternatively: you can select each individual one on the list and press the Assign button to manually load each file.
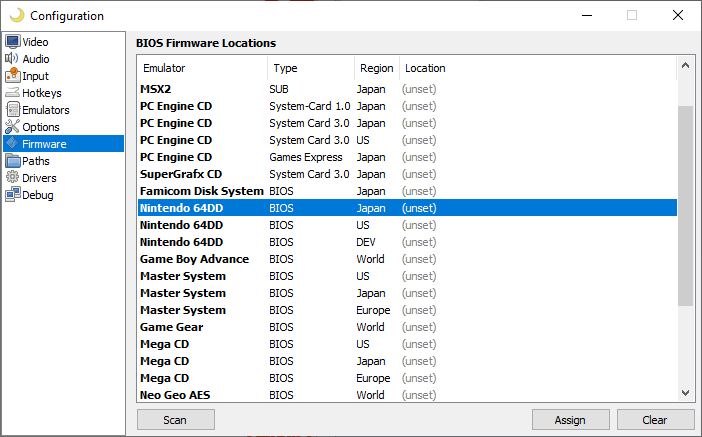
- Alternatively: you can select each individual one on the list and press the Assign button to manually load each file.
- You have now set up the IPL ROMs.
Second Step: Setup the Controls
- At this point, setup the controls in the Input configuration tab.
- If you are confused on the button binding, change Virtual Gamepads to Nintendo 64 (or Nintendo 64DD, it does the same thing) to have a more direct understanding.

- If you are confused on the button binding, change Virtual Gamepads to Nintendo 64 (or Nintendo 64DD, it does the same thing) to have a more direct understanding.
Final Step: Setup the 64DD Date & Time
- Once the controls are setup, launch any 64DD disk using Load -> Nintendo -> Nintendo 64DD.
- You can use the english translated retail format F-Zero X Expansion Kit Disk (or any other US retail format disk image) if you want the following setup in english.
- Then, you will get an error screen with Error 48. THIS IS NORMAL, YOU HAVE DONE NOTHING WRONG.
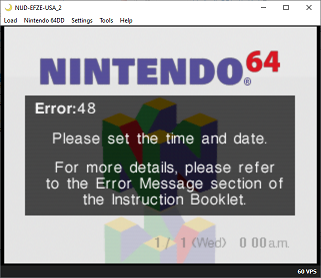
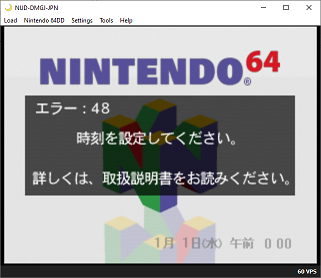
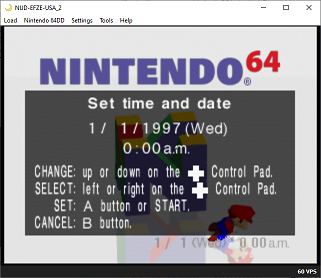
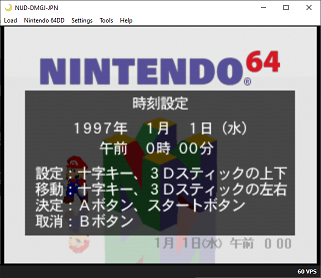
- This error shows up because the 64DD time was not setup. To set it up, hold the Nintendo 64’s A button for a few seconds to show the date & time setup screen.
- You’ll have the date & time screen setup. The controls are as shown. Watch out as you set up the date & time because:
- The english screen is in MM-DD-YYYY format.
- The japanese screen is in YYYY-MM-DD format. Watch out to not be confused with AM and PM hour time as both use the 12-hour format.
- You do not need to set this up again. See below if you want to reset the time.
Once it’s set up, you can now play 64DD games! Have fun!
- You can launch any 64DD game by using Load -> Nintendo -> Nintendo 64DD. See below for how to load expansions.
Extras
N64 Mouse
- It is recommended to have both a controller and a mouse, as all games that supports it tend to expect a controller as well for other features.
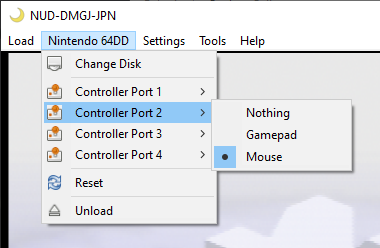
- I therefore recommend to go to Input settings, stay in Virtual Gamepads, but then select Controller Port 2 and then Mouse.

- Then, right click on each mapping and select the appropriate Mouse mapping you are given for each.
- I therefore recommend to go to Input settings, stay in Virtual Gamepads, but then select Controller Port 2 and then Mouse.
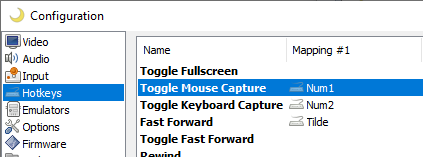
- If you want to use the N64 Mouse, you need to assign a hotkey to toggle the mouse capture.
- Make sure you remember this hotkey!
- Make sure you remember this hotkey!
- Then, if you want to use the N64 Mouse, make sure to set it up before the game boots (you can set it up when the Nintendo 64 logo shows up).
- If you were not fast enough, don’t worry, you can use the Reset option and not worry about it.
- You have to do this every time a game is loaded.
- The reason why you cannot change after the game boots is because most Nintendo 64 and 64DD games only check the controllers at boot.
If you change the controllers, those games would not detect them and still think the setup is like it was at boot.
- To use the mouse, while the game is running, press the hotkey you have assigned to lock the mouse. Press it again to unlock the mouse.
Swapping Disks
Warning: Do not swap disks until the game tells you that you can, else the game will get confused.
- On the menubar, go to Nintendo 64 / Nintendo 64DD, then Change Disk.
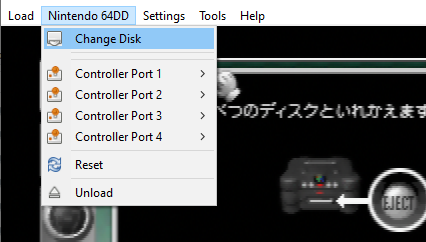
- Then select the 64DD disk file you want to swap with.
- If you click Cancel after doing this, the disk will be removed from the emulated drive.
- You are usually expected to swap back to the original disk you started with, so don’t forget which file it is!
Load N64 Game + Expansion Disk
- To load a N64 game alongside its expansion, such as F-Zero X + F-Zero X Expansion Kit or Dezaemon 3D + Dezaemon 3D Expansion disk…
- Load the N64 game first with Load -> Nintendo -> Nintendo 64. (Not Nintendo 64DD!)
- It should automatically ask for a disk file after loading the first file, and it should be enough.
- If you do not want to play with a disk, just click on Cancel and the N64 game should start without any disk loaded.
Troubleshooting
Crash upon loading a 64DD game (up to v138 included)
- Disable Run-Ahead in the Options configuration tab to make 64DD games working.
Random stuttering
- If you have random stuttering as you play 64DD games, it’s probably because of the auto-save feature.
- Disable Auto-Save Memory Periodically in the Options configuration tab if that’s annoying you.
- However, if you do this, the save will only happen when you change games or close the emulator. If the emulator crashes, your progress won’t be saved!

Reset the Date & Time
- You can delete the time.rtc file in ares’s folder then Systems -> Nintendo64DD.sys.
- You will then have Error 48 the next time you boot. Refer to the Final Step above if unsure of the controls.
Mario Artist Polygon Studio has issues selecting models
- If you have trouble selecting models, faces or vertices in Polygon Studio, then you are probably rendering in higher than SD Quality.
- You have no choice but to play in SD Quality, Supersampling will not help.
